Garden trees to Bonsai

Let’s get one thing out of the way first. The term Yamadori refers to a tree lifted from the wild where it has spent many years, showing good age with features that will make a great Bonsai. When a tree is lifted from a garden or from any other place for that matter it is not a Yamadori, not even an Urban Yamadori as some people refer to it. Yamadori in my mind is for one thing and one thing only.

I have recently seen a photo of a very nice Magnolia Bonsai tree and wanted to try my hand at one. As luck would have it, a garden tree that was to be removed was advertised in my area and I jumped at the opportunity.

What we have here is a garden plant that has been grown as an ornamental plant in a garden bed. It is a Michelia figo or a Port wine Magnolia. It had to be removed as the owners were in the process of remodelling this garden area.

The original “plant”.

Great was my surprise when I parted some of the branches and discovered that it is actually three trees. It is important to make sure that there are no irrigation or other hidden water or electricity services going close to or underneath the digging area. The first job is to reduce the branches and foliage to get closer to the trunk and this will also help with survival as the branch and leaf mass needs to balance the root mass. Through the digging process and also the potting process, the root mass will also be reduced. And then the digging starts.

Branch and leaf mass reduced.

This was an easy dig as there are no tap roots and especially the two in the back were in quite dry loamy soil and they came out with just a spade length pushed into the soil about thirty centimetres from the trunk and circled around each plant.

The Three Musketeers.

It is important to leave the site in a tidy state and in this case I also removed the green waste for the owners. Each tree received a good spray of medicine water. Medicine water for me is just a weak solution of a marine-based or algae-based tonic across all parts of the tree. Now it is homeward bound.

The best advice is to have the planting containers ready before you go, but probably not so practical as you never know how big the root ball will be. in this case I used plastic planting pots, deeper than what a Bonsai pot will be, but this is to allow space for finer root development.

Good drainage is essential.

The first thing I do is to work through the roots. Remove all of the old garden soil and in this case some fat earthworks as well. Next is to remove very thick roots and reducing the depth of the root ball. Leave enough finer roots to feed the tree. I also apply rooting hormone powder to the cut roots and sprinkle a bit over all roots. Depending on the species, but more importantly, the state of the roots, I also apply sphagnum moss to the cut roots at this stage. In this case I did not as there were enough roots and they were healthy.

Next up is to find a possible front of the tree by finding the widest part of the nebari and lining this up with the best flow that the branch structure allows. This is also the time to now reduce or shorten the branches to fit this vision of what the future tree could like like in five to seven years. At this stage I do not remove all branches to limit the tree to just one or two styles or designs. In all three cases it is possible to highly likely that the main trunks will be shortened over time. as the pots are round there is no need to worry too much at this stage about the front of the tree for planting purposes. Just focus on what might be needed for future development.

Now for the planting. Good drainage is essential. The soil that I use for this type of planting is a 1:1 ratio of pumice and compost. These are broadleaf trees and will grow relatively unchecked over the next year or two. They will all be heavily fertilised as soon as new growth comes out. The compost base helps with this and the pumice provides the necessary drainage.

The soil is heaped up in a dome shape inside the containers, the tree is pushed down and wiggled into the soil, tied in with wire and then filled up to the top level. I use my fingers and then a rounded dowel to work the soil in-between the roots. All that is left now is to water the trees and to let them rest until spring when the feeding will start.

Updates will follow as these trees develop. I usually tend to keep one if I have multiples from the same type and sell the others. That just means that updates at times is on just one or two of the trees as the others might be making someone else very happy.

Please leave comments on this post.
Beginner’s Series: Make a start

You are now bitten by the bug and you are well on your way to addiction and now you want to design, bend, shape, cut, wire and do all the other things to expand your growing collection. Yes, there is a lot of art to it, but you can get far by following a few basic steps. I call it my Bonsai Beginner’s Curriculum and have done many workshops based on these basic seven steps. It works well on nursery material as well as field lifted trees which have been planted and allowed to rest for at least a year. Here we go with the seven steps.

Nursery stock

Step 1: Find the front of the tree. This includes looking at the trunk flare / root zone (nebari). You want the widest and most interesting part to face the front. The second part to this step is to find the best front showing the flow or movement of the main trunk line. Hopefully the best nebari view and trunk line is the same side, if not, make a decision based on the best of the two elements.

Step 2: Clean the main trunk. This includes getting rid of all unwanted growth. It could be removing one or more branches reducing the bar branch effect. Also remove branches pointing to the front in especially the bottom third of the trunk and branches crossing the trunk. At this stage remove all growth in the crotches of the main trunk and primary branches.

Step 3: Set the main trunk. If you are lucky, the movement of the trunk will be great and you have nothing to do. This is rarely the case. Use wire to set the shape. There are other more advanced strategies and methods that can be used. If you are using guy wires, it is best to wire the branches first as the wires sometimes get in the way of further work.

Thick wire can be used to bend this trunk.

Step 4: Select the main branches. You have already looked at this during step 2. What you now need to do is to look at the positioning of branches. The historical pattern is to have one to the one side, then to the other side and then one growing backwards. Repeat as you move up the trunk line. Nature and practicality does not always give this to you on a platter and this is where the artistic side of Bonsai kicks in. Also make sure that you do not have branches growing from the inside curve of a bend.

Step 5: Clean the rest of the tree by removing all growth from the axils / crotches of all branches. Remove the rest of the unwanted growth and especially spindly growth. At this point it is important to note that once you remove all leaves / needles from coniferous plants, it is highly likely that the bare branch will die. Perfect for Jin (more advanced technique).

Step 6: Set the main branches. Use wire on the branch or guy wires. Wiring technique is also slightly more advanced and will follow in a future blog or video. Ensure that there is movement in the branches (left, right, up and down). This is an easy way to bring leaves / growth closer to the main trunk on spindly growth.

Step 7: Create the apex. The apex is the top of the tree and plays a major role in determining the flow of a tree. Older trees show a more rounded apex form and this is what you want to recreate by either pruning or wiring the branches into that position.

Crotches are clean and branches set by using guy wires.

By now you should have a design roughly resembling a pre-Bonsai tree. After-care is the next important step. My advice is to not pot the tree into a Bonsai pot at this stage. If you have removed a lot of growth, the tree will be stressed and the last thing it needs now is to have its roots interfered with. Rather just place it in a sheltered position with no harsh afternoon sun. Water regularly and fertilise the tree to encourage health and good growth. Potting can be done in Spring or for certain species, Autumn could be suitable as well.

Keep an eye out for further articles in the Beginner’s series. If you subscribe to this blog, you will not miss any of those.

If you need one on one tuition, have a look at the subscriptions page on this website.

Show them off – Preparing a tree for a show

To prepare a tree for a show starts a long time out from the show. It actually starts with your general maintenance regime, your design philosophy and daily dedication to your overall collection. The normal sequence for getting a tree in a show is to decide on which tree will be entered and then an acceptance from the organisers to have that tree in the show. This could at times be problematic as the time between the acceptance and the show could be very short. My advice is to start the show preparation before the tree is entered as it should be of a more than passible quality when entered.

The Tree

The tree must be in excellent health and show the characteristics of the species. Al dead and not so healthy looking leaves and needles must be removed and all excessive and not needed wiring should be taken off as well. It is OK to have some wiring, but this must be discrete and only used to refine minor things. Wiring must be applied correctly as it can detract from the overall scoring if not done so. Also ensure that all leaves and needles growing downwards (species and style specific) are removed and that foliage clouds are distinct and neat.

Ensure that the main trunk line is clear and clean (the whole tree must be clean). Look out for insects and spiders and remove these. A smooth trunked tree can be cleaned by spraying a little bit of vegetable oil on it and rubbing gently with a paper towel.

The nebari and roots must be checked as well. All of the above apply to this area also.

Deadwood (Jin) should be clean. This can be done by brushing it with a toothbrush and using tweezers to get small pieces of debris out of narrow and hard to reach places. Lime sulphur should be applied a few weeks out from the show to allow it to settle. If needed give it a brush for the colour to settle in with the rest of the tree.

Soil

All weeds and fine protruding roots must be removed. Take weeds out and the finer roots can be covered with moss if it cannot be removed. Moss should be in pristine condition. This is one of the tasks that cannot be left to the last minute. If you do not have moss ready, you can grate old moss and apply this to the soil surface, even better if it is on a layer of fine sphagnum moss. Pay as much attention to this aspect as you would a prize-winning lawn.

Pot

The To prepare a tree for a show starts a long time out from the show. It actually starts with your general maintenance regime, your design philosophy and daily dedication to your overall collection. The normal sequence for getting a tree in a show is to decide on which tree will be entered and then an acceptance from the organisers to have that tree in the show. This could at times be problematic as the time between the acceptance and the show could be very short. My advice is to start the show preparation before the tree is entered as it should be of a more than passible quality when entered.

Display

All components making up the display must be clean and in good condition. The so-called three-point display technique will compliment your tree. This usually consists of the tree on a stand, an accent tree or plant and a scroll. One of the two non-tree elements could be a Suiseki. The dimensions and placing of the three elements are crucial to get a view of one, but to still emphasise the tree as the main focal point. My best advice with this is to have a few stands, scrolls, accent plants and even Suiseki at the ready and to try different combinations.

One of the best things you can do is to study as many displays that you can get your hands / eyes on. This is not difficult with the internet at our fingertips. All the top shows across the world are represented in thousands of photos on the internet. Happy showing!

Simplicity is the goal in every art.

I do believe that there are concepts in any art form that are universal. With that believe, I also explore other art forms for inspiration, ideas and motivation as well as skills and knowledge. I have recently embarked on trying to improve my photography skills as I am notoriously bad at it. In the process of reading up on this topic, I stumbled upon this statement:

“Ultimately, simplicity is the goal in every art, and achieving simplicity is one of the hardest things to do. Yet it is easily the most essential.”

What does this mean for Bonsai? Bonsai in its simplest form is a tree in a pot that resembles an old tree in nature. That then probably takes us back to the original design concepts as proposed by Chinese and Japanese scholars and masters from the beginning to today. My own opinion is that the strictness of the original, especially Japanese rules, have been watered down over the years as Bonsai art started to spread to other parts of the world since World War II. Western ideas of what art looks like and what it should be as the individual philosophies of artists as well as the type of Bonsai material that they can work on has shaped this over time.

Simplicity can also refer to the horticultural side of keeping trees alive. It comes down to water, nutrients, climate, inclusive of light requirements. Yes, it is that simple, but take any one of these for granted and you end up with a deteriorating or dead tree.

From a design perspective it is important to know something about the different styles or forms of Bonsai and by then adhering to the style “rules” in its purist form, simplicity in design will be shown. Part of this is to follow the basic shape and growth pattern of the original tree if it comes from nature or has been in a pot for a long time. Radically changing the shape or form of a tree away from its natural flow, can not only stress the tree, but also lead to a quite complicated design that might need constant maintenance or interference to keep it in that shape. This means that the tree is kept under stress for a longer period of time.

A tree that does not show these characteristics or one that can be shaped from seedling or cutting stage will be easier to shape and still adhere to the concept of simplicity. What does this look like?

  • Establish a flared, radial root system growing from a wider buttress and is exposed at soil level.
  • From here a gradually tapering trunk will grow depending on the style.
  • The first branches will start about a third of the trunk height from the soil and will alternatively grow on two sides of the trunk with every third one to wards the back.
  • These branches will gradually become shorter and thinner as you move towards the top or apex of the tree.
  • The apex could be in-line with the nebari or base of the trunk.
  • Finer branches are grouped to allow the leaves or needles to form “foliage clouds”.
  • Empty spaces or the spaces between the branches will balance the tree to form a whole or one unit to look at.

That is bonsai design at its simplest or most basic. We do know that it is never that simple. Branches do not necessarily grow in that pattern and nature sometimes play cruel tricks on plants (this could be great for Bonsai) to alter growth patterns and directions. This is where the artist comes in and it leads to a second quote from a photography resource:

“Photography is not looking, it is feeling. If you cannot feel what you are looking at, then you are never going to get others to feel anything when they look at your pictures.”

I am not too concerned about what other people think of my trees. I need to be moved or have an emotional reaction to a tree for it to make impact. I also do believe that it is this, the fact that a Bonsai tree can invoke a feeling, an emotional reaction, that makes it art. I also do believe that it is usually the simplicity in a design or form that triggers the higher emotion. Less is more. Wabi-sabi. Literati. The emotion of a trees that looks old, feels old, shows character, fits its pot and as a whole make you stand still and study it, is a piece of art.

A lot of very complicated designs, excruciating bending, very heavy wire and at times heavy machinery (not really, just power tools), are used to get a tree to look like a Bonsai tree. Is this part of our instant generation? It has its place under the right conditions. I just wonder whether going back to the original simplistic view of Bonsai, the pure meaning behind the art form and taking a longer view or approach to the development of the tree, might not stir a stronger emotional reaction and make more people fall in love (also known as addiction) with this pure, simple and very rich art form.

What do you think?

Pine Seedlings as Cuttings – Early work to get a killer Nebari.

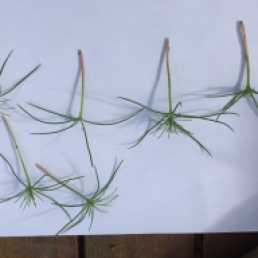
In an earlier post (https://wordpress.com/post/bonsaiplace.net/515), I have written about imagethe germination of Pine seedlings. These seeds (planted on 26 January 2016) germinated very fast and are now large enough to change into cuttings. The reason why I do this is that it gets rid of the tap root early on and forces the seedling to grow new roots and the hope is that the new roots will develop radially for a really great nebari. That is theory.

I started off by making sure that I have all the tools needed to start the process. This included containers with seedling mix, a surgical blade, hormone rooting liquid as well as my trusty Rhizotonic.

IMG_0292

The first step is to wet the seedling mix in the container with the Rhizotonic solution. Rhizotonic is a dynamic, organic root stimulator and stress reliever (wonder whether it works for humans?). I use it for everything that is re-potted, yamadori that are planted and especially for plants where a lot of roots have to be cut.

IMG_0297

The next step is to very gently remove the seedlings from the original container. This phase needs to be accurate and quick as the seedlings cannot dry out during this time. The seedlings are placed on a cutting board and the tap roots are removed by cutting through the seedling where the stem and taproot meets. It is important that a very sharp blade is used as the stem cannot be bruised or crushed at this stage.

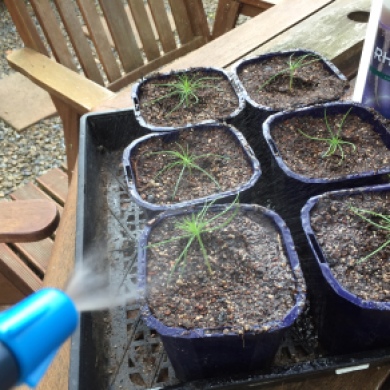
The seedlings are then handled by the leaves to further prevent bruising to the stem and it is placed in the rooting hormone. From here the seedlings are quickly planted in the seed raising soil. The seedlings are now watered in with the Rhizotonic solution and placed in a shady, but warm location. From here the seedlings will be sprayed with the Rhizotonic solution twice a day and if necessary even three times a day. Now the wait begins. The date today is 20 March 2016.

Nebari – The Root of the Matter

938277CE-FFB2-4BE6-B1C5-98D83AA77553

These roots have grown over time, dropping of the side of a cliff.

No, we are not talking about the Nebari fictional alien race from the planet Farscape, but the Japanese term generally used to indicate the roots and specifically the root flare at the bottom of the trunk where the root region starts. It also indicates the visible surface roots.

Wikipedia refers to it as: “Also known as “buttressing”, nebari is the visible spread of roots above the growing medium at the base of a bonsai. Nebari help a bonsai seem grounded and well-anchored and make it look mature, akin to a full-sized tree.”

img_1634

My idea is to write three or so Blogs focusing on Nebari and the development of roots. There is no doubt in any Bonsai artist’s mind that the roots of a plant is where it all starts. Healthy roots = healthy plant (generally). A plant absorbs most of its water and nutrients from the soil through the roots. We therefore have to know something about soil and its water retention and draining properties. Not all soils are created equally. We also need to know something about the physiology and anatomy of roots. This knowledge will help us to understand many of the concepts around root pruning. This will come in later Blogs.

Autumn bonsai images 2014 (17)

A tree growing in a woodland area. These roots definitely add to the character of the tree and indicate that it has been there for a while.

Getting back to the Nebari, the main aim of establishing a root flair at the base of a tree is to indicate age. A wider base caused by a flaring just above the roots, helps to establish the taper of a tree. One way to develop taper is to increase the circumference of the tree at the base and to keep the top of the tree relatively thin. Young trees do not have a huge flair at the base, but older trees show this without fail. In saying that, there are trees that are used for Bonsai that do not show a big root flare. Junipers come to mind here.

root310

The roots are spread over a flat surface and tied to this surface.

There are multiple methods to improve the Nebari of a Bonsai tree. The first one is the continuous root pruning of downwards growing roots. For the health of the tree it is advised that this is done over time to enable the tree to grow new roots in the place of the removed roots. A second method is done through air layering. This is simply done through preparing the bottom of the trunk as one would for air layering and heaping up the soil or packing sphagnum moss around this area. Roots will over time establish themselves in that area. I have read about a method where a wire is bound tightly around the trunk just above the roots. The flow of nutrients will be impeded and that will cause new roots to grow from above the wire. I have not tried this method myself before and cannot comment on how successful it is. Other methods include drilling holes through flat tiles and tying the roots of the tree in a horizontal direction to the tile with wire through the drilled holes. It could also be done through grafting.

In the end, the Nebari plays a vital role in the aesthetics of the tree. It is crucial thfotolia_2553306_XSat some sort of Nebari be established as it indicates age, shows that the tree is balanced and sturdy and has been there for a long time.

The next Blog will address the science behind root development.

Maple Progression

This Acer stands 35 cm tall and is still very much in training. This photo was taken in May 2013 and it shows the tree in full Autumn splendor.

IMG_1235

Soon after this photo was taken the tree lost the last of its leaves and the branch structure can clearly be seen here.

IMG_1420

The branch on the right is too straight, but the tree does need a bit of width. The smaller branch above it still needs to grow to fill that gap. The three branches going almost straight up is also disturbing on the eye. What cannot be seen here is that the tree has very few back branches which means very little depth.

IMG_1899

Skip seven months and this photo is from the other side. A back branch has now been pulled down by the guy wire and the second branch on the left (previous photo right) is filling in nicely.

027

This photo was taken in December 2014.

5 April 2015 029

5 April 2015 030

There is now more width to the tree, but the vertical branches making up the apex have not been sorted yet. That is the next phase of development, a repot come spring and that will be in a smaller, more appropriate pot.