Horticultural Processes and Bonsai: Respiration

We have already looked at Photosynthesis https://bonsaiplace.net/2021/07/17/horticultural-processes-and-bonsai-photosynthesis/ and Transpiration https://bonsaiplace.net/2021/07/18/horticultural-processes-for-bonsai-transpiration/ as two processes that are very important for plants and your Bonsai to stay alive. There is a third such process which is as important as the other two, but because the structures responsible for this one are not that visible, it is not that well known. Respiration is something that is done by all living organisms. It basically comes down to the exchange of gasses that is needed to survive, just like in a human being. We breathe in and out to get Oxygen in and to release Carbon dioxide. Well, plants need to do the same thing as Oxygen is needed for plant cells to survive and they also release Carbon dioxide as a waste product.

Intuitively one would then wonder how Photosynthesis and Respiration is balanced so as to make sure that the plant produces more Oxygen than what it will use itself. Respiration can be classified as either Aerobic Respiration (enough Oxygen around) or Anaerobic Respiration (not enough or no Oxygen present). The latter one is a problem for plants and something the Bonsai grower needs to be very aware of. The best example of this is in Yeasts through the process of Fermentation.

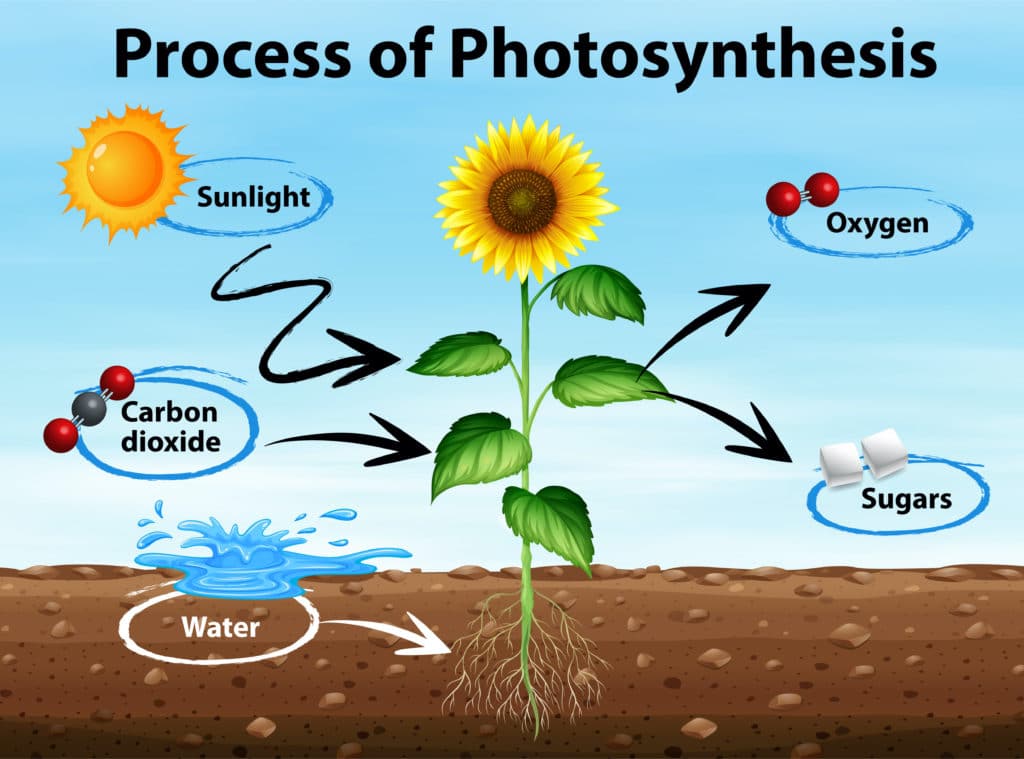
Looking at the diagram below, we can see how the two processes interact. The one’s products become the other process’s raw material (input) and vice versa.

Important points for Bonsai growers:

  • Water logged soil do not allow a good flow of air through the soil which means that there is very little to no Oxygen available for root cells to take this gas in. Due to myriads of bacteria living in soil, and some of these can live anaerobically (in the absence of Oxygen), the chances that these bacteria can cause rot and other damage is large. Best to avoid water logged soil.
  • Drainage: This aspect is linked to the point above, but important enough to elaborate. Good drainage will promote good airflow through the soil. It is almost like a suction effect in the sense that as water runs through the soil, air will follow and in this way increase the air flow (ventilation) through the soil and the end result is that you have happy roots and happy roots equals happy Bonsai.
  • Pots: Bonsai pots can be very small in relation to the root mass of the tree planted in it. That means less soil compared to a plant in a garden and this can also lead to less air in the pot. Training pots especially are important. At Bonsaiplace when we use timber boxes or even plastic containers as training pots, we always drill extra holes, not just underneath for drainage purposes, but also from the sides to increase air flow for respiration.
  • Hothouses and covering Bonsai plants or cuttings with plastic. The main reason why we do this is to increase the humidity around the plant. That helps to prevent water loss through transpiration and increases the heat to promote growth. Just keep in mind that through photosynthesis the plant will produce Oxygen that in turn will be taken up for respiration purposes and Carbon dioxide will be produced for Photosynthesis to take place through Respiration. Where the problem comes in is when you do not have leaves on the plant, i.e., cuttings or a deciduous tree. That means no Photosynthesis and although Respiration needs are low, it still takes place. Just allow fresh air to get into the plastic covering at times and this problem will be sorted.

The next blog will look at Secondary Thickening. This is the process through which plants produce wood and bark. Exactly what we want for our Bonsai trees. To make sure that you do not miss this one, please subscribe to our website and like this post. It is all free.

We can also be found on Facebook as Bonsaiplace and on Instagram as BonsaiplaceNZ. Yes, there is also a You Tube channel as Bonsaiplace.
Horticultural Processes and Bonsai: Transpiration

Have you ever wondered how water travels from the soil into the roots and then up the stem to the leaves? Well, here we go. The process is called transpiration and starts in the roots through a process called osmosis. This is the movement of water across a membrane from an area of higher pressure to an area of lower pressure.

Now I am going to confuse you completely. I already said that it starts in the roots, but the condition for the process to happen actually starts in the leaves. As the water accumulates in the leaves, the internal volume of the leaves now have a higher pressure internally compared to the atmospheric air. That means that the water leaves the leaves through a structure called a stoma. There are hundreds of these on the leaves and they can open and close depending on the plant’s water needs and the climate on the outside. Almost like little valves.

Transpiration

Osmosis

Now we have the picture on both ends of the tree. The water flows in through the roots due to water pressure in the soil, it moves up a bit in the tubes (xylem) as these are very thin and act like thin straws. Have you ever noticed how when you place a straw in water how the water level in the thinner straw is higher than the level in the water. That is called capillary pressure.

What now happens is all of these work together. The water is pushed into the roots, the narrowness of the tubes give it a bit of a head start and then the pull from the leaves draws it further up the stem or trunk and the flow happens. This can happen as fast or as slow as the conditions dictate. If everything is perfect, a continuous flow will happen, but as soon as something changes, the tree will adapt. Let’s say there is not enough water in the soil for the osmosis to take place. In other words the pressure is not high enough for the water to enter the roots through the different membranes, well, water will not be taken up and the tree will dry out.

At the other end things can go horribly wrong as well. Let’s say it is a very hot day and a dry warm wind is blowing. That means the pressure on the outside of the leaf is very low and if there is any water inside the leaf, this steep difference will cause water to evaporate or transpire through the stomata and if this happens rapidly and the cells lose their turgidity (pressure), it will wilt and lose structure. If this happens for too long, it is possible that the plant will dry out and leave this earth for Bonsai tree heaven.

Before we get to the practical things to do and look out for, it is important to remember that water travelling through a plant will contain minerals and other chemicals that it absorbs from the soil. It therefore plays a very important role in the distribution of these minerals throughout the tree.

The practical things:

  • Watering is a very important part of keeping Bonsai and comes down to a balancing act to ensure that optimal conditions exist for the processes as described above to take place.
  • Make sure that your trees are placed in an environment that suits the watering needs of the tree. Plants with thin leaves that can dry out easily i.e., Maples and should be kept out of harsh sun and dry windy conditions.
  • Trees with smaller leaves or even needles (Pines) can withstand this a bit more as they have less stomata and a thick waxy cuticle that covers the leaf or needle to minimise the area exposed to sun and wind and therefore slow transpiration down.
  • Get to know the water requirements of your trees and if possible group trees with similar water requirements together.
  • Check the drainage of your trees regularly. This starts with ensuring that the potting medium / soil is correct for the type of plant. Plants that thrive in drier conditions will have to be planted in a coarser and free draining medium.
  • When watering, water from the top over the whole tree as it washes dirt off the leaves to enhance transpiration as well as photosynthesis. It also cools the plant down so not to lose too much water.
  • If the soil is too wet, root rot can occur. This is not necessarily due to something going wrong with transpiration, but more a case of the roots not being able to breathe. Yes, they have to breathe as roots consists of living cells and through the process of respiration, need to take in oxygen. More on this in the next article in this series. It is also a perfect living condition for fungus that causes root rot.
  • Other techniques to ensure the soil does not get too wet is to tilt the pot during long periods of rain for water to run off. You can also push a rod through the drainage holes through to the top to create a channel for water to run through. These are drastic measures only to be used in circumstances where you need to get rid of water quickly.
  • Soil can dry out very quickly in a small Bonsai pot. When you get to a situation where the soil is so dry that water on top just runs off the surface, break the surface up a bit and dunk the whole pot in a container of water. Wait until all air bubbles disappear and place it back on the bench.
  • Another thing to look out for is when the roots grow so fast that it basically replaces the soil in the pot and all you have in the pot is a ball of roots. It is difficult for the plant to absorb water under these circumstances. Prevention is better than the cure. Repot with fresh soil when necessary and treat your trees as if they are pets.
  • When pruning, cover the cuts with cut paste or something similar as you create a wound and in the context of this article, a leak. Plug the plumbing to support the flow of water through the tree.

To receive notification of the other articles in this series on the horticultural processes for Bonsai, like, comment and very importantly, subscribe to this blog.

You can also follow us on Facebook as Bonsaiplace and on Instagram as BonsaiplaceNZ.

Horticultural Processes and Bonsai: Photosynthesis

It is a well known fact that horticultural knowledge and skills should be on par with the creative side of Bonsai cultivation as a horticulturally neglected tree will never reach its full potential as a Bonsai. It is therefore important that some basic horticultural knowledge and skills are mastered early on the journey towards Bonsai mastery.

This series of articles has it as goal to highlight a few processes in horticultural science and linking this knowledge to Bonsai creation and maintenance. We will start off with the most important one and that is Photosynthesis. Others will follow in subsequent articles.

Photosynthesis

A bit of knowledge relating to cell science will help here. In plant cells, usually where there is a green colour, you will find cell organelles called chloroplasts. Inside these there is chlorophyll, a colour pigment, and this one is attributed to the green colour in plants. This is where photosynthesis takes place. Photosynthesis is the process through which plants use raw material to produce food. The raw materials are carbon dioxide and water and with the aid of energy from the sun, food is produced and oxygen is made as a by-product of this process.

What does this mean for Bonsai? The most important part here is the exposure to light. Without this natural light source not enough energy will be available for this process. The second part is that there should be enough chloroplasts available for this process to take place. The significance of this comes in at pruning time. It needs to be at the right time as there should be enough energy / food stored to carry the tree through the period with either no leaves or very few leaves, as at this time food production will be limited. This is crucial for evergreens as the food storage or energy storage side of these plants are not as well developed as what it is for deciduous plants. See the process of transpiration in another article as it plays a role with this as well.

In summary:

  • Your tree should have adequate light for food production.
  • Your tree should have adequate water for food production. Water plays a role in other processes as well which makes watering a crucial task for healthy Bonsai growing. See transpiration as an example.
  • Adequate ventilation is necessary to allow atmospheric carbon dioxide to get to your tree. This is usually not a problem in the outdoors, but something to think about when you cover trees with plastic to increase heat and humidity for growth purposes or other climatic defensive reasons.
  • Pruning and defoliating. Time this right. Never defoliate an evergreen completely unless it is just a branch or two for the purpose of creating deadwood / Jin.
  • When positioning branches and foliage pads, make sure that top branches do not cover lower branches too much.

Please like or comment on this post and subscribe for regular updates. It will cost you nothing.

Subscribing will help as you will get the updates for the other processes covered in this series. That includes transpiration, respiration, growth, secondary thickening, tropisms and the importance of hormones in all of this.

Bonsai Branch selection 101

Have you noticed how most answers to Bonsai related questions starts with “It depends”. The main reason for this is that we are working with a living organism and it is very rare for generalisations to be applied across all trees. The list below are guidelines to use, especially when styling a new or starter Bonsai tree and applies very much to the more classical Bonsai styles. There will always be exceptions, but here goes.

Branches within the lower one third of the tree. These branches should generally be removed as it helps to show the trunk line. It will expose the nebari and allow a clear view of the bottom part of the trunk where hopefully is some great interest. This can be either well-developed bark, interesting roots or some type of movement lower down in the trunk. There is an exception (I told you so!) and that is when you deliberately wants to leave these branches as sacrifice branches to help with thickening the lower trunk.

Branches pointing directly at you. The main reason here again is to allow the main trunk line to be visible. The exception is in the top third of the trunk / tree, especially if these branches are part of the apex of the tree.

How about this Jin? Should it be removed? Maybe just a slight turn at the next repot and it is not pointing at you anymore.

Bar branches. These branches are ones that originate at the same level as other branches. If they are directly opposite each other, it is known as bar branches. Another issue with too many branches originating at more or less the same point is that a lot of sap will floe through that area which leads to an unsightly thickening in that area and could also be the reason for reverse taper. This is a thickening at that point with a narrower trunk below that point. Remove as many of these as you can, especially found in pines where the branches for a whorl, preferably leaving one as part of an alternately opposite branch scheme. Select the one that fits the rest of your design more naturally.

Look at the bottom two branches. Not on the same branch, but still opposite each other, forming a bar branch.

Parallel branches, usually originating close to each other, but directly above each other. This is more for aesthetics than growth patterns. The classical design of a branch to one side, then the next one up on the other side and then maybe a back branch and to be repeated as you move up the trunk, is the ideal and not always possible, but at least a good guideline to keep in mind.

Two parallel branches. What to do?

Branches growing from almost the same point. This relates very much to the last two guidelines, but in this case refers to branches not necessarily growing parallel above each other or from the sight height, but just close enough for it to be unsightly. There is always the possibility that this will also lead to a situation where that area can thicken disproportionately compared to where other branches grow from to the increased sap flow.

Quite a few growing from the same point or level.

Unusually vigorously growing branches. These branches take energy away from other branches and can cast a shadow across other branches due to its faster growth. It is also possible for these branches to thicken disproportionally to other branches and interfere with normal taper or the notion that branches lower down the trunk should be thicker than branches higher up the trunk. These branches should be shortened or removed.

Secondary branches growing from primary branches where the growth is in the wrong direction. This could be branches growing straight up or straight down, branches growing outside of the main design contours or even in the opposite direction of the flow of the tree or just that part of the tree or branch.

The leader. Older trees show a more rounded apex and this can be achieved by removing the leader, substituting it with a new leader or wiring it in such a way that it shows a more rounded form. This also helps with reducing apical dominance in trees and redistribute the energy in a tree.

As mentioned earlier, very few trees allow the opportunity to apply all of these guidelines, but it is still a good idea to keep these in mind as you work through the tree, selecting which branches to keep and which to remove. This is a video of the branch selection of a Camelia clump lifted from a garden. https://youtu.be/MeCBk-_ofEw

Please like, comment and / or subscribe to this blog. Your support is greatly appreciated.

We are also on Facebook and Instagram.

Literati Juniper First Foliage Pad work.

This Juniper came to me as a very neglected tree about a year ago. After a solid nutrition program and tender loving care it is now ready to get some work done on it. The major job will come in Spring (seven months away) when the first big repot with fresh soil will take place. For now, let’s get the pads placed in a better position and also do some thinning of the vigorous growth.

The music is in the background, not embedded in the video and stops at some stage. No talking, just working.

Pruning Bonsai Maple Trees

Introduction

The aesthetic and monetary value of a Bonsai tree is determined by its health, shape, size, age and these days the celebrity status of the artist. All of these, accept for the last one, can be enhanced through proper care which includes shaping, pruning and pinching as developmental techniques.

Why Pruning

There are a few reasons why Maples should be pruned or trimmed. Developing structure is a big part of this and then culminates in developing good ramification and a pleasing shape. The different phases depends on whether you are working on a seedling, a well-established tree or a tree that was field grown and in its early stages of development.

The seedling or young plant is the easiest as it can still be bend in a suitable shape and very little cutting is needed until later. Use wire for this bending. At this young stage it is important to develop the basic structure and to leave as much growth as possible to feed the trunk.

The more advanced tree will have its main flow established and the emphasis is now on branch development according to the desired style and shape. The great thing about Maples is that you can cut a whole branch off and in a few years’ time you can grow a new branch in a more suitable place or with more movement in it. This is where patience comes in.

This is also the time to remove unwanted growth such as bar branches, crossing branches, branches that do not add to the aesthetics of the tree like branches growing upwards and downwards, interfering with layers above or below it.

Once the tree is established and with a desirable structure and flow, you start to refine the secondary and tertiary branches by either trimming back to a couple of leaves or by using the pinching method. This enhances ramification and forcing the internodes to be shorter. Defoliation is part of this strategy and this also helps to reduce the leave size.

I also do believe that deciduous trees, like conifers need to have the energy throughout the tree balanced. Apical dominance plays a big part here. Sometimes lower branches become weaker. This can be due to the top of the tree growing too vigorously or just because the lower branches are shaded out by the upper branches. By removing some of the upper leaves or just reducing them in size by removing about half of the leave, more light is let through.

The Timing of Pruning

The best time for structural pruning and shaping is early to late spring as the tree is getting out of dormancy and will be full of vigour to get growing again. Heavy pruning or shaping should not be done around repotting time when large quantities of roots are removed. A lot of the trees energy is stored in the roots and when this is removed, new growth will be jeopardised. If you are not going to remove a lot of roots during repotting, pruning can be done at least two weeks before repotting.

How to Prune

For structural pruning, use sharp cutters and seal the wound with sealing paste or something similar. You want the edges of the cut to be clean and not torn. Hollow the wood in the cut a little bit by using knob cutters (rounded blade) or even a Dremel tool. The cambium (thin green layer just under the bark) needs to be kept moist and healthy (that is what the paste is for as well) to allow it to grow and roll over the wound and after time, sealing the wound off for a natural appearance.

The main reason for pruning throughout the growing season is to keep the internodes short, the leaves small and the most important one, increasing ramification. It is also used to create layers or foliage clouds by removing upward and downward growth.

The main refining method is trimming, supplemented with pinching in more established trees. The general convention is that you will prune back to two or four pairs of leaves. This is done when the new branch has extended to three or more pairs of leaves. Sharp scissors are used to cut through the central shoot and leaving a short part of this shoot still intact. Maples do die back where a cut is made. By leaving a short stalk, the die back will not affect the buds from where new growth will sprout.

Pinching is used on well-established tree and is a refinement technique. The new leaves are removed just as they start to unfurl, as early as still in their embryonic stage. If there is a specific area where you want denser growth, remove the leading shoot as well as the two side shoots. The finer leaves will have finer twigs and this all adds to refinement and better ramification. This is what gives deciduous trees and especially Maples, the great silhouette during Winter time when the tree is without leaves.

Large leaves can be trimmed off at any time. As mentioned before, this will allow more light to penetrate through to the interior of the tree which in turn will cause more back budding to occur.

Defoliation

Defoliation can take place by mid-summer as long as you still have a decent length of growing season ahead. As mentioned, this will lead to smaller new leaves growing and will also help to allow more light to penetrate into the tree. This can be done by removing all leaves. Only do this when the tree is healthy and you have good weather conditions ahead. It will take up to three weeks for leaves to grow again. Defoliation can also be used to balance the energy and growth across a tree. If a specific branch is lagging behind, partial leave removal on that branch can help to invigorate the branch. This method is not as invasive as complete leaf removal and allows the branch to grow new shoots. I personally prefer to defoliate over two weeks. I do the lower branches first and then over the next two weeks move up the tree until done. This is less stressful and balances leave growth across the whole tree.

Conclusion

  • Think about and plan structural pruning as well as refinement pruning and pinching.
  • The health of the tree always comes first.
  • Use sharp and clean equipment for cutting and pruning.
  • Prepare and clean cutting wounds.
  • Always use cut paste on larger wounds.
  • Keep the big picture in mind.
  • Make cuttings of the prunings.

Please leave a comment below or hit the like button. Feel free to peruse this blog site.

Bonsai: Wood and Bark

It is universally understood that old tree trunks and branches mainly consist of wood and not much of the softer stuff. To copy or create age in Bonsai, it is therefore desirable to have as much wood and bark as possible. These things do come with age and is very desirable in Bonsai, especially the bark, as that is the most visible part on trunks and branches and even on exposed roots.

Well formed bark

So what is wood? If you start peeling off the outer layers of a tree trunk or branch, you will find two kinds of wood underneath these top layers. Closest to the bark or outer layer is the sapwood. This is moist and a living layer consisting of the xylem fibers. These are tubes which help the tree to transport water and nutrients from the roots to the leaves. The mechanism for this is explained in other posts on this site.

Underneath this layer, you will find the harder layers called the heartwood. This is dead material and basically consists of the xylem tubes which are not hardened by resins and no longer transport water and nutrients. This is the wood of the tree and is easily recognizable by the annual rings.

Annual Rings.

Back to the external layers. On the outside of the sapwood you will find the cambium and this is where the growth takes place, thickening the tree and the source of the annual rings. On the outside of this, you will find bark forming. This is basically just the original epidermis (outer layer of cells of a young plant) that undergo chemical and structural changes over time to form the woody or corky dead tissue that we know as bark. This is brittle and not well fastened to underlying layers.

One of the important things to remember for Bonsai is that when we bend a trunk quite severely, you might here a bit of cracking going on. This is usually the deadwood and as long as you do not snap it completely, it does not interfere with the living parts of the tree, merely the structural bits. What you need to be careful of is to not break the outer layers too much as that is where the water and nutrients are being transported through.

To form a permanent bend in a branch or trunk, the wire will assist to keep the branch in position for the resins and dead fibres in a tree to settle in the new position and then hold it there. This is why you need to keep the wire on for a s long as possible, but at the same time be careful of the outer layers still growing and growing around the wire. Technically it is not the wire biting in, more a case of the outer layers growing around the wire.

We also have to be very careful with the bark. As it is an outer layer and not very well attached to the underlying layers of a very old tree, it can come off very easily. As pointed out earlier, it is desirable to have the bark on trees like oaks, redwoods and others, it needs to be protected. A few things to do is to never pick a tree up by its trunk, cover the bark with rafia when applying wire and protect the bark with sifter material when using guy wires.

Please comment below and also subscribe to this blog on the left of this to receive updates.

Weeping Bonsai Trees – NZBA Convention Demonstration and Talk

I was asked to demonstrate at the recent 2019 New Zealand Bonsai Association National Show and Convention. I decided to talk about Weeping or Pendulant trees as these trees are quite scarce in New Zealand at show level. There was only one weeping style tree in the National Show, a native Kowhai tree.

The interesting thing is that many people spoke to me afterwards to tell me about their weeping Bonsai trees and even about going to have another look at taking cuttings from Willow trees, probably the easiest of trees for this style.

Below is a video of the presentation that I used. I started off by talking about the biochemistry and the role of geotropism (movement or growth caused by gravity) and the effect of that on auxins in the tree to allow branches to grow downwards. Next was a few slides of weeping trees in nature to show the most important principle of building an upwards growing structure first before you look at the weeping parts of the tree. This was followed by slides of relatively well-developed weeping style Bonsai trees.

I also showed a Willow tree from a cutting, a nursery sourced weeping Beech tree and another nursery sourced weeping Bottlebrush. I talked about wiring the main structure and then also the use of guy wires and objects to hang off the branches to pull the branches downwards. It also included examples of fishing line with weights attached and even the humble clothing peg to act as weight to help gravity do its thing.

Lime Sulphur and Bonsai – multitasking chemical

Lime Sulphur is usually used in the Horticulture industry to control scale insects, moss, lichen and fungal diseases on plants. It can be used for all of these issues when it comes to Bonsai. A use that is not listed on the container is to whiten deadwood / Jin.

As always, safety comes first when you use any chemical. In this case, it is not just the smell (rotten eggs comes to mind), but also the fact that this chemical is corrosive. It is a good idea to wear gloves and to protect your eyes. Wash your hands very well afterwards and keep your hands away from your face.

Follow the instructions on the container for all uses. As said, the whitening of deadwood is not listed as a normal use of lime sulphur. One thing to keep in mind is to also protect the soil surface from lime sulphur dripping or being spilt on the surface. Remember, this chemical is also used to kill moss! You do not want to kill of your lush green carpet covering the soil surface. I usually use plastic wrap for this purpose.

I dilute the lime sulphur 50/50 with water and I do this in a plastic or paper cup as it is easier to just throw it away afterwards than trying to clean it and getting rid of the smell. I also use a 12mm brush for most applications, but can go smaller or larger depending on the size of the job.

I also find it easier to apply if I slightly wet the surface of the deadwood. The Juniper that I worked on here had a bit of rot at the bottom where the tree meets the soil surface. This was cleaned well and the lime sulphur was liberally applied here. The chemical protects the wood against rot by acting as a preservative.

After application, clean the brushes well and get rid of the container. Wash your hands and allow the lime sulphur to dry and work its magic on the tree.

Bougainvillea: From climber to Bonsai, first steps.

A friend of mine is going to make alterations to his house which includes demolishing the garage. As my luck would have it, a relatively old Bougainvillea climber is growing on the side of the building and it was going to end up at the dump when building starts. I kindly offered to remove the plant for him. So today was the day, overcast with the odd light rain falling. Perfect conditions for the operation.

IMG_0477

The first part of the job was to take the plant down to stump level. This took about an hour as this Bougainvillea had a lot of quite large thorns. Once that was done, the stump was wiggled and I found that it had two large roots going to either side of the plant. One of the surprises was that the wood is quite soft and this extended to the roots. The spade went right through a two-inch thick root with one go at it.

One of the roots grew underneath the building and as it was quite close to the building, I decided to pull the stump over to the front. On the one hand this was a mistake as the large root tore in two which left it with quite a large wound (was going to have one anyway due to the cut), but on the other hand, it left me with a smaller plant now separated from the larger stump. Not bad, two plants for the price of one dig.

IMG_0482

I quickly cleared the area up and did not wrap the roots as I would normally do as it was a ten-minute drive to get home. At home, the two plants were placed in a bucket with water in which I dissolved some aspirin. Aspirin has the same active ingredient that is found in willow bark and this is said to be supporting root growth stimulation, just like hormone rooting powder.

From here I prepared two pots by adding drainage material (stones) at the bottom and then filled the rest with 1 part compost and two parts pumice. I also shortened the larger stump. More rooting hormone powder was applied, planted, watered and placed in a good, protected spot. The good old human attribute of patience will be applied while we await the outcome.

IMG_0483IMG_0484IMG_0485

Wiring in three phases.

I prefer to wire and shape trees in three stages. The first stage involves the trunk and larger branches. The second phase incorporates the secondary branches and the third is the fine wiring and placement of tertiary and finely developed, ramified branches / twigs with leaves or needles. Each phase lasts a minimum of a year and includes at least one growing season. This video shows some intermediate wiring.

Why? I do find that this way produces a better, more refined product and it gives the tree more time to adjust and recover from harsh bends. My gut instinct tells me that it might also be better for sap flow in especially Junipers compared to trees that undergo a full wiring, bending, cutting and sometimes even a full repot in one session. I do hope that this last scenario is not a common thing.

I might have to change this as I now live in a warmer climate with a longer growing season. Time and attention to growth patterns will tell.

Chamaecyparis progression

What to do on a wintry day with the wind howling outside, rain bucketing down and more to come judging by the Ruahine Ranges covered in dark, ominous looking clouds? One idea is to cuddle up and get a good book out, another to get a hearty soup on the go, but the one that I gravitated towards, was to work on a nursery stock, small Chamaecyparis obtusa standing on my Bonsai bench. It has been there for more than a year now, just waiting for a day like today.

The Chamaecyparis, also known as the Hinoki False Cypress, is native to Japan. It is a very slow growing tree and the nursery label on this little one states that it will grow to 60 cm high by 50 cm wide in 10 years. It has whorled branches of lovely dark green foliage and an upright habit with character and charm. Obviously not for long.

Before I start, here is some more information on the Hinoki Cypress. The foliage consists of evergreen, fine scale-like leaves, dark and shiny green above (adaxial) with glaucous margins between scales which form a distinct “x” shaped pattern beneath (abaxial). This species is monocious with small male reddish brown cones and slightly larger female flowers which are round and yellow-green in color. It bears fruit in late summer, but these are quite small. The bark is gray and scaly with long furrows of reddish brown inner bark which peels in long, narrow strips.

With this wind howling outside, I am going to let it influence my thinking and create a windswept (Fukinagashi) style shohin. I am sure that other styles will come to mind as I progress with this little tree.

Chaemocyperus progression and Bonsai 016

This is what I thought the front of the tree should be based on the Nebari.

Chaemocyperus progression and Bonsai 018

This is the view from the other side after a quick clean-up of the lower branches.


Chaemocyperus progression and Bonsai 017

The Nebari shows more prominent growth on the left hand side. This means that the tree could slant towards the right.

Chaemocyperus progression and Bonsai 019

With that in mind the leaves are removed from the smaller branch.


Chaemocyperus progression and Bonsai 020

The rest of the tree is cleaned-up by thinning out some of the foliage.

Chaemocyperus progression and Bonsai 021

At a slight slant to the right.


Chaemocyperus progression and Bonsai 023

This looks like a nice little tree already with the bark stripped off the smaller branch (Jinned) as well as a back branch and some other smaller branches.

Chaemocyperus progression and Bonsai 024

I could have stopped with the previous photo’s style, but wanted to style this in a Windswept style. Slightly more pronounced slant, more thinning and wired.


Chaemocyperus progression and Bonsai 025

The final product, all potted up and kept in a sheltered place.

Chaemocyperus progression and Bonsai 027

The size is 16 cm by 10 cm by 10 cm. Now it will be fertilized and watered regularly.